If you have an online store with a lot of categories and products, it is important that you literally provide Google with a map of where it should go, what it should pay attention to, how often, and so on. This way you will make sure it “doesn’t get lost” among all your URLs. And for this, it is essential to generate a sitemap for PrestaShop.
But first, some basic notions.
Table of contents
what is a sitemap?
An xml sitemap is a document (in xml format) where all the URLs of our PrestaShop store that we want to be considered for indexing in Google are dumped. You can even indicate the crawling priority of each URL, according to its importance. This does not mean that they will be indexed. Only that you want them to be indexed.
If for example you have two or three categories that generate the highest percentage of conversion in your store, the URLs of these categories will have priority over the others, since they are the ones you want Google to have updated.
As a map that is, you should include only the most important routes (URLs). Like when you go to a big city and the tourist map shows you the big avenues and some surrounding streets, but not the smaller ones where there is really nothing to see.
Because that’s the concept: your sitemap for Google will only include the URLs that you want it to crawl, and therefore – if it’s okay with Mr. Google – that you want it to index.
We repeat: not all URLs must be included in the sitemap. And very important: the pages that are included in your PrestaShop Sitemap must have the index tag in their HTML. With it you are telling Google that it can include it in its index. Because there’s no point in having a No Entry street on a map, right?
Now, let’s get to the heart of the matter: generating and configuring a sitemap for your PrestaShop.
Generate sitemap for PrestaShop 1.6
You can do it using free sitemap generators like this one (if you don’t have more than 500 URLs) or this one, where you simply have to enter the URL of your store and it is created instantly. Of course, you will not be able to configure options for almost anything.
Therefore, if you have your online store in PrestaShop, it is recommended to create the sitemap through a module that is specific for it.
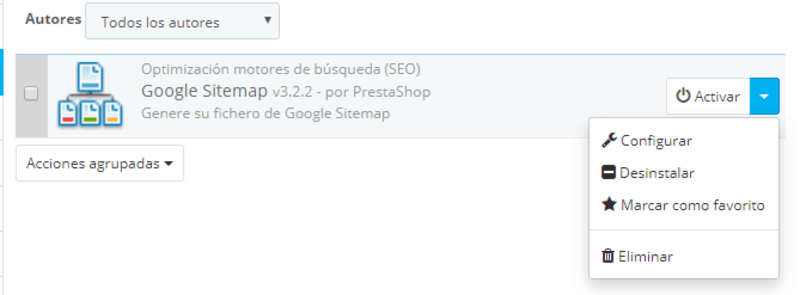
If you still have PrestaShop version 1.6, you will see that the Google Sitemap module is integrated to effectively create a sitemap! To locate it, you must go to the back of your online store → modules and services and there, search for “Sitemap” in “List of modules”

From the dropdown, we give the option Configure:
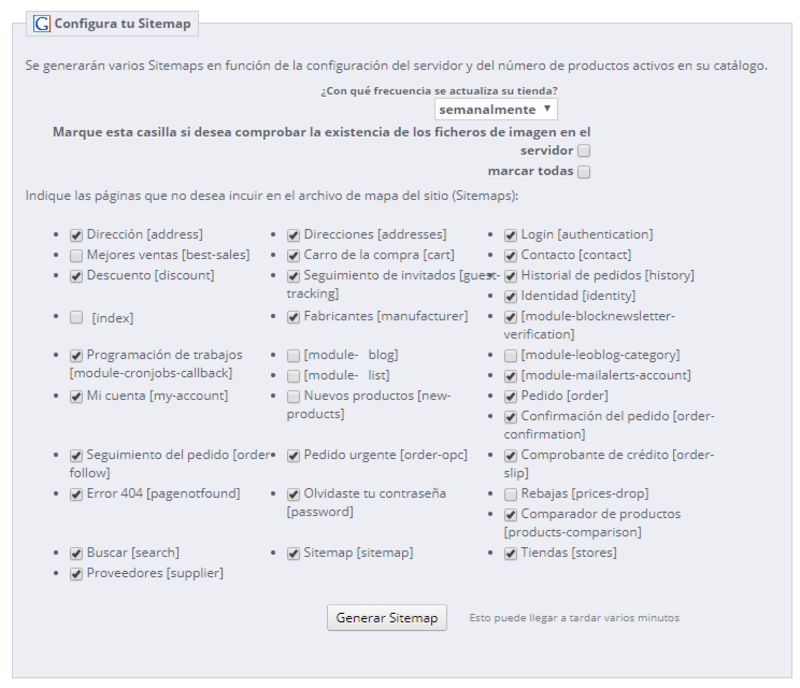
And then we get to the next screen, where we can configure the PrestaShop Sitemap indicating how often we want it to be updated and check the boxes of the pages that we do NOT want to be included.
This will depend on what we want to send to index in each project, depending on the structure and if for example we play with the pages Best sales or New products for internal linking. But it is normal that only the index page is unchecked.
Once the PrestaShop sitemap is generated, do not forget to submit its URL through Google Search Console. In the new design of the Google console you have it easy: once you have already registered your store – here we explain how – you just have to enter the section Index > sitemap that you will see on the left, and copy the URL of your sitemap:

Generate sitemap for PrestaShop 1.7
In the new version, the Google sitemap is not installed, but in this official PrestaShop forum you have the link from which you can download it in one of the answers. In addition, they provide an interesting conversation about the problems that can arise when using it.
So, although as we have told you, you can use the Google Sitemap (which is also totally free) to create your map, it is really very basic. That’s why we advise you to download a module from PrestaShop addons for better performance. Among all the possibilities you have, you will surely find the module that serves to generate the PrestaShop sitemap that best suits your needs.
Keep in mind that if you have a huge ecommerce, you can even separate the sitemap by products, categories, images… Something that PrestaShop’s Google Sitemap does not offer you. And of course, if you have a blog, you have to configure another sitemap for it. Especially because the sitemaps should not be very large, so it is advisable to divide them to improve the crawl budget.
At Innovadeluxe, as PrestaShop Platinum partners and specialized developers that we are, we have created our own module to add a sitemap to PrestaShop, which we explain below.
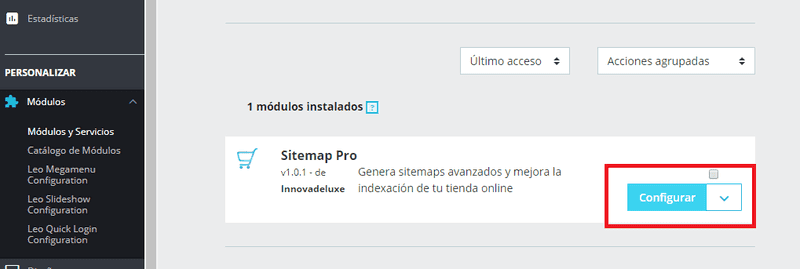
The access is in the same path: home > modules and search for “sitemap”. And the first thing you will see is the “Configure” button
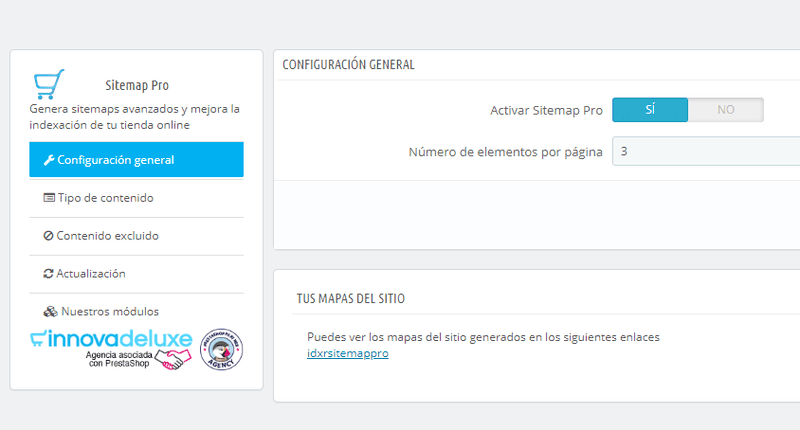
Then you will see a page with a series of options that we are going to see step by step.
You must activate Sitemap Pro and indicate how many elements you want per page. Remember what we said before that it is not advisable that a sitemap is very large. Therefore, if you have 100,000 articles and you want only 10,000 to appear per sitemap, in “Number of elements per page” you must indicate 10,000 and it will split them into 10 sitemaps.
Now we go to the section “Type of content” and is where we begin to appreciate the difference with respect to the default sitemap generator. Here we have broken down the types of content that are generated in a PrestaShop store. And with a single click, you can leave out of the indexing everything that does not interest you, just like that, all at once.
For example, the pages of the CMS (content management system) are not URLs that Google should take into account, let alone those that users will reach organically. Why tell it to consider them for indexing? And as I mentioned before, you can decide not to include products – since in 99% of the cases, products are not going to rank, and what you have to work on are the categories, which are usually the ones that have the highest conversion rate.
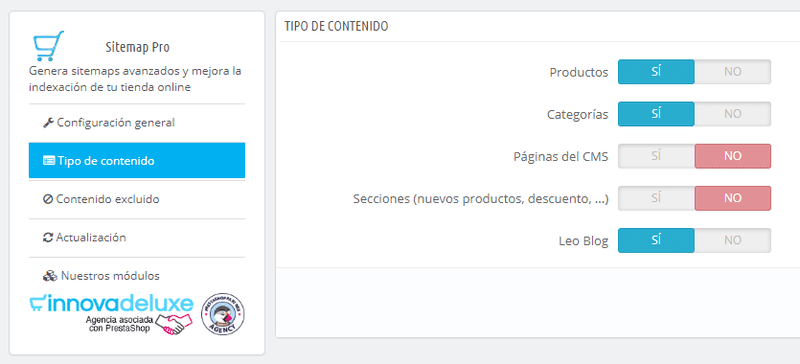
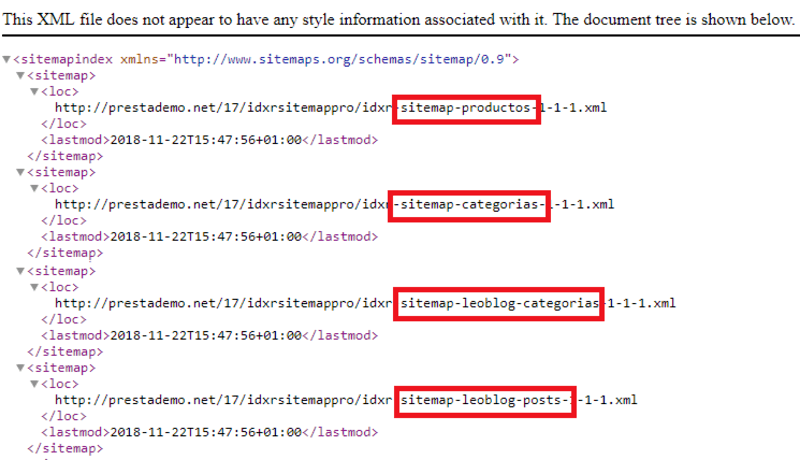
With our selection, a sitemap will be created for each type of content. That is to say: a sitemap for categories, another for products, another for the blog… as you can see in the following screenshot:
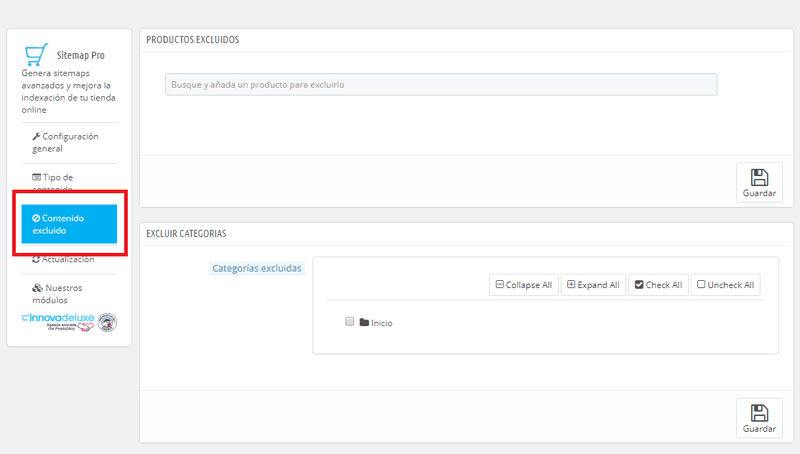
The tab “Excluded content” is almost the most interesting part, because with it you will be able to optimize your sitemap to the maximum, and therefore the crawl budget – making Google not to waste time with what is not interesting and get to what you really want it to take into account.
If you leave the configuration with the products out of the sitemap, you will really only have these 3 options to configure.
 But if you have decided to index your products, you can indicate the URLs of some specific products that you do not want to put in the sitemap. Even if for some reason you have one or more categories of your online store that are not really intended to receive organic traffic, you can also remove them from this option of the module.
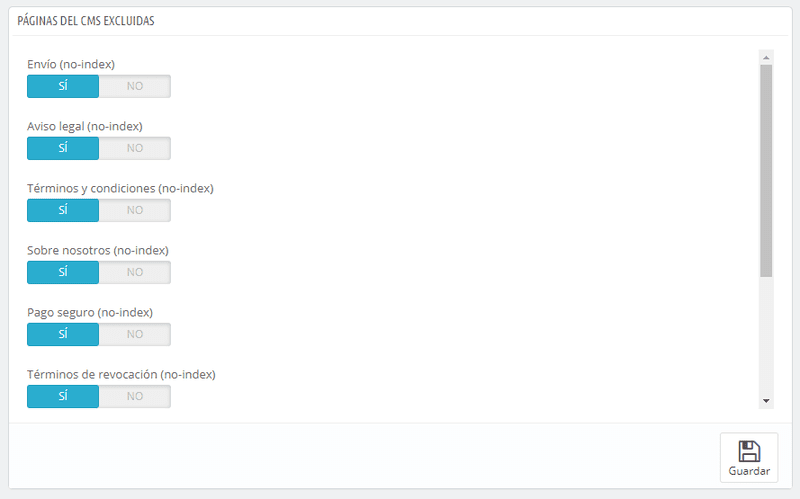
Within Excluded Content you can also choose the CMS pages that you do not want to appear – although as we mentioned before, it is advisable that none of them appear, since their search intent is zero.
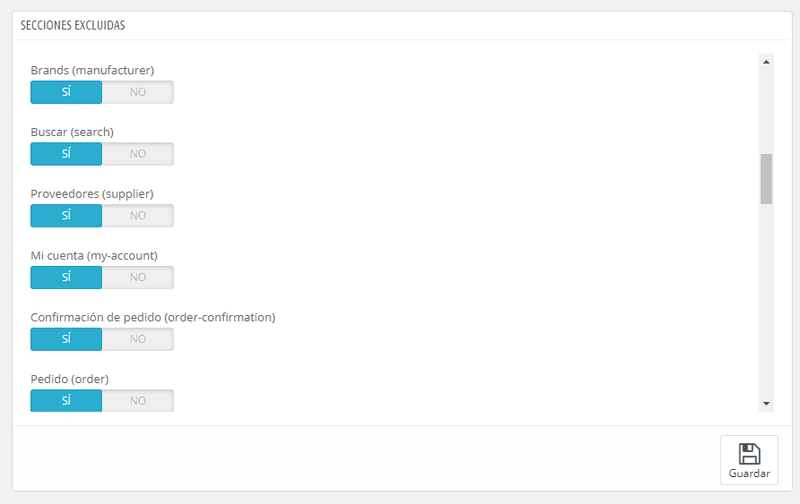
The same goes for certain sections. Do you want to position the URLs that are generated when searching in your PrestaShop? I’m sure you don’t. Well, here you have the option to exclude them. Does it make sense for the order confirmation page to appear in a Google search? As you can see, the reasoning applies to all sections marked in the screenshot for exclusion.
Although these sections you can exclude them from the Google sitemap PrestaShop, it must be said. But in this module you can remove them all at once if you tell it from the beginning that you do not want to index CMS pages.
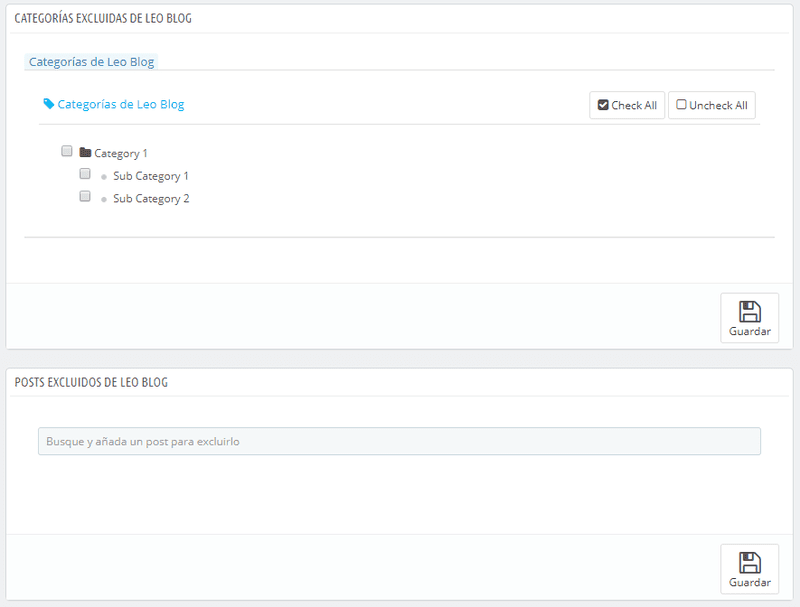
Even in the case of the blog, you can also indicate if there is any category or subcategory that you do not want to include for consideration of the Google index. Or you can refine it even more by indicating only one post (or several) that you do not want to put in the sitemap. For example, if it is a content about something specific that is not updatable and does not contribute anything, you can indicate from this option to exclude it from the map. It’s as simple as that.
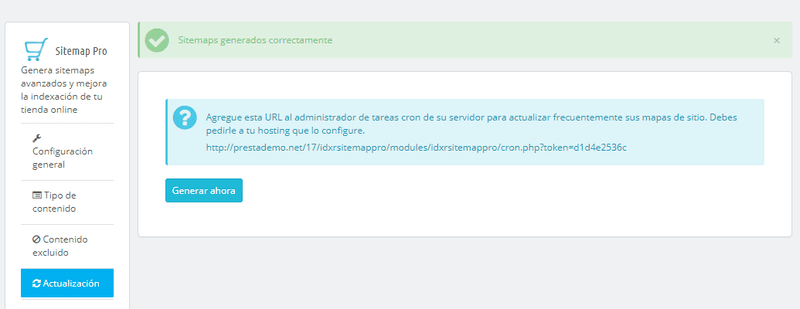
And the last step is, of course, generate it to add the sitemap to PrestaShop. This can be done from the last section, which is the update section.
Update PrestaShop sitemap
As you can see, the PrestaShop sitemap needs to be updated. How regularly, that will depend on how often your store is updated. Or if you have a blog that is updated weekly or monthly – but remember that the blog must have its own sitemap.
If for example you are a dropshipper and your products appear and disappear quite frequently depending on the stock they provide you with, you will have to update it every day. Another option is that your store works with seasonal products, so you only vary the stock two or three times a year. In other words, the frequency will depend on your needs.
In the case of PrestaShop 1.6 or 1.7, if you use the Google Sitemap PrestaShop module that comes by default, you can already set the update frequency. In the case of using our module for PrestaShop 1.7 version, you have to add to the cron tasks of your server the URL that is generated when creating the sitemap and from there set the frequency. But don’t worry, because this is something you should ask your hosting provider to do for you.
Conclusion
Having a sitemap of your PrestaShop store is very important. More important the bigger the store is, because you are going to generate thousands and thousands of URLs and it is highly recommended not to include URLs that are useless for search engines. Otherwise, if you have a limited crawl time, it is very likely that the robot will not see the URLs you really want it to see.
do you have your sitemap optimized? In that case, if you are interested in our sitemap module for PrestaShop, do not hesitate to contact us. Optimize the indexing of your online store and do not waste time!


Deja un comentario